Beyond the Storm Living™️ is an Amazon Associate. I earn from qualifying purchases at no extra cost to you and may also earn from other affiliate links.

Tuesday, September 9, 2025

Wednesday, August 20, 2025

Alla prima technique: Bold and Spontaneous Art

August 20, 2025 0 Comments

alla prima watercolor painting technique

Watercolor Alla Prima Tutorial: Master One-Session Wet-into-Wet Painting Technique

You've probably been taught that watercolor requires multiple layers and careful planning. But what if you could create stunning, vibrant watercolor paintings in just one session? Watercolor alla prima technique breaks traditional rules by completing entire paintings while the paint stays wet, creating natural color blending and atmospheric effects impossible with layered approaches.

What You'll Learn in This Watercolor Alla Prima Tutorial:

  • What is Watercolor Alla Prima Technique?
  • Common Problems and Solutions
  • Step-by-Step Alla Prima Method
  • Real Painting Examples
  • Best Materials for Alla Prima Watercolor
  • Frequently Asked Questions
Quick Summary: Watercolor alla prima (Italian for "at once") is a direct painting technique where you complete your watercolor artwork in one continuous session using wet-into-wet methods. This creates spontaneous color mixing, soft atmospheric effects, and captures the immediacy of your subject with fresh, vibrant results.
Tutorial Inspiration: Thank you to Ilia Ibryaev for the excellent watercolor alla prima tutorials that inspired this comprehensive guide. The paintings pictured in this guide are from his tutorials.

What is Watercolor Alla Prima Technique?

The Problem with Traditional Watercolor Methods:

Most watercolor tutorials teach you to work in careful layers, waiting for each section to dry. This often results in:

  • Muddy colors from overworking
  • Lost spontaneity and freshness
  • Stiff, overcontrolled paintings
  • Missing the fleeting effects of natural light

The Alla Prima Solution:

Single-session watercolor painting preserves the natural flow and luminosity of watercolor while creating effects that are impossible with traditional layering:

  • Natural atmospheric perspective through wet-into-wet blending
  • Preserved color intensity and transparency
  • Spontaneous, lively brushwork
  • Perfect for capturing changing light conditions

Example 1: Atmospheric Fog Landscape Alla Prima

watercolor alla prima fog landscape painting tutorial

Watercolor alla prima fog landscape showing natural atmospheric effects achieved through single-session wet-into-wet painting technique

Notice how the wet-into-wet watercolor technique creates natural fog effects that would be nearly impossible to achieve with traditional layering methods. The colors blend seamlessly, creating authentic atmospheric depth.
Credit: Ilia Ibryaev (Drawing Dog Marathon)

Complete Step-by-Step Watercolor Alla Prima Method

Phase 1: Planning Your Single-Session Watercolor

1. Choose Simple Subjects for Alla Prima Success

  • Landscapes with atmospheric effects (fog, mist, soft light)
  • Sky studies with cloud formations
  • Simple still life arrangements with unified lighting
  • Plein air subjects with changing light conditions

2. Set Up Your Watercolor Alla Prima Workspace

  • Arrange all materials within easy reach
  • Pre-wet your brushes and test paint consistency
  • Have clean water and paper towels ready
  • Position your reference (if using one) for easy viewing

Phase 2: The Alla Prima Painting Process

3. Start with Light Value Washes

Begin with your lightest tones using very diluted paint. In direct watercolor painting, you must establish your light values first since you cannot go back to lighten areas.

4. Work Wet-into-Wet for Natural Blending

While your initial washes are still damp, introduce adjacent colors. This is where the magic of watercolor alla prima technique happens - colors blend naturally on the paper.

🎨 Master Advanced Watercolor Blending:
Complete Watercolor Blending Techniques Guide →
Learn 5 professional blending methods

5. Build Gradually to Dark Values

Add progressively darker tones while maintaining wet edges where you want soft transitions. The key to successful one-session watercolor painting is working confidently without overworking.

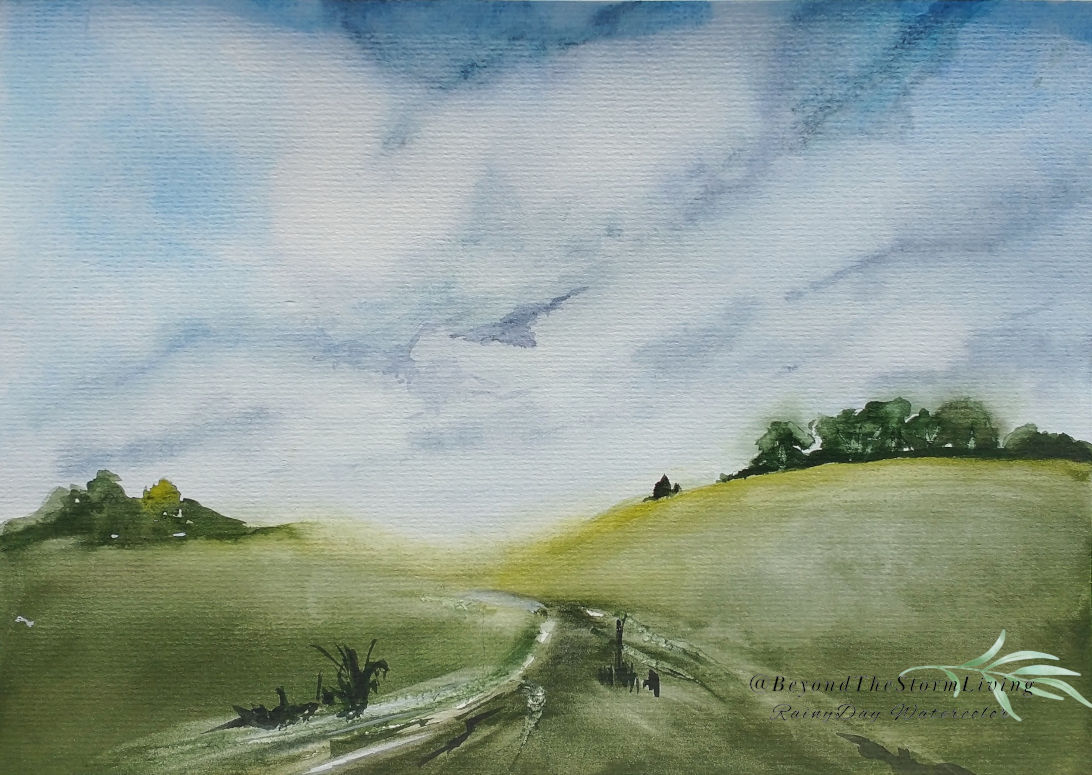
Example 2: Landscape Alla Prima Demonstration

watercolor alla prima sky landscape painting tutorial

Watercolor alla prima landscape demonstrating seamless cloud formations and color transitions using single-session painting methods

This plein air watercolor alla prima example shows how working in one session captures the natural flow of sky colors and cloud formations. The wet-into-wet blending creates realistic atmospheric perspective.
Credit: Ilia Ibryaev (Drawing Dog Marathon)

Essential Materials for Watercolor Alla Prima Success

Recommended Watercolor Alla Prima Setup:

  • Paper: Cold-pressed watercolor paper (140lb minimum) - holds water well for extended working time
  • Brushes: Round watercolor brushes (sizes 8, 12, 16) - avoid stiff brushes that fight the natural flow
  • Paints: Professional watercolor pigments with good transparency
  • Palette: Large mixing area for color combinations
  • Water containers: Two jars - one for cleaning, one for clean water
💡 Get My Complete Watercolor Supply Recommendations:
Complete Watercolor Supplies →
#affiliatelinks

Ideal Color Palette for Alla Prima Watercolor:

  • Ultramarine Blue (mixing essential for atmospheric effects)
  • Raw Sienna (perfect for warm earth tones)
  • Quinacridone Rose (transparent mixing color)
  • New Gamboge (clean yellow for color mixing)
  • Burnt Umber (for dark values and shadows)

Common Watercolor Alla Prima Problems and Expert Solutions

Problem: Paint Dries Too Quickly

Solution: Work on properly sized paper, use more water in your initial washes, and paint in sections rather than trying to cover the entire surface at once.

Problem: Colors Become Muddy

Solution: Limit your palette to 4-5 colors maximum. Muddy colors in watercolor alla prima painting usually result from mixing too many pigments or overworking areas.

Problem: Lost Control of Water Flow

Solution: Practice controlling paint consistency. For wet-into-wet watercolor technique, use paint that's creamy but not too thick, and learn to read paper dampness levels.

Problem: Painting Lacks Structure

Solution: Plan your light and dark value patterns before starting. Single-session watercolor painting requires more upfront planning than traditional methods.

Frequently Asked Questions About Watercolor Alla Prima

Q: How long should a watercolor alla prima session last?

A: Most successful watercolor alla prima paintings are completed in 30-90 minutes, depending on size and complexity. The key is working while the paint remains workable.

Q: Can beginners learn watercolor alla prima technique?

A: Yes! Watercolor alla prima for beginners actually teaches essential skills like color mixing, value control, and confident brushwork. Start with simple subjects like single flowers or basic landscapes.

Q: What's the difference between alla prima and wet-on-wet?

A: Wet-into-wet watercolor technique is a method of paint application, while alla prima refers to completing the entire painting in one session. Alla prima often uses wet-into-wet methods but encompasses the complete painting approach.

Q: Is watercolor alla prima suitable for detailed paintings?

A: Direct watercolor painting works best for subjects emphasizing atmosphere, mood, and overall impression rather than fine details. For highly detailed work, traditional layering methods are more appropriate.

Q: How do I prevent watercolor alla prima paintings from looking unfinished?

A: Focus on strong value contrasts and ensure you have definite light, medium, and dark areas. One-session watercolor painting should have clear focal points and well-defined shapes despite soft edges.

Advanced Watercolor Alla Prima Techniques

Mastering Atmospheric Perspective in Alla Prima

Use the natural properties of wet-into-wet watercolor technique to create depth:

  • Distant elements: Very wet, pale, soft-edged
  • Middle ground: Medium wetness, moderate values
  • Foreground: Controlled dampness, strong values, defined edges

Color Temperature Control

In immediate watercolor painting technique, use warm and cool color relationships to create spatial depth and visual interest without relying on fine details.

Take Your Watercolor Alla Prima Skills Further

Next Steps for Mastering Single-Session Watercolor:

  • Practice plein air watercolor alla prima to develop speed and confidence
  • Experiment with different subjects - from watercolor alla prima landscapes to simple portraits
  • Study master painters who used direct painting techniques
  • Join online communities focused on direct watercolor painting methods
  • Document your progress with before/after photos

The beauty of watercolor alla prima technique lies in its honesty - what you see is what you get. There's no going back to "fix" things, which forces you to paint with intention and embrace the natural flow of watercolor. This single-session watercolor painting approach will transform how you think about watercolor and help you create more spontaneous, lively artwork.

Related Watercolor Techniques: watercolor alla prima tutorial, single session watercolor painting, wet into wet watercolor technique, direct watercolor painting method, watercolor alla prima for beginners, one session watercolor tutorial, plein air watercolor alla prima, immediate watercolor painting technique, watercolor wet on wet tutorial, alla prima watercolor landscape, direct watercolor painting methods, single session watercolor techniques, watercolor alla prima tips, wet into wet watercolor painting, watercolor alla prima step by step

Thursday, August 14, 2025

Easy Beginner Landscape Watercolor

August 14, 2025 0 Comments

Easy Beginner Landscape Watercolor Tutorial
Sweeping Colorful Skies & Simple Silhouettes 🌅

This beginner landscape painting is all about letting the sky steal the show! With just a few colors and simple wet-on-wet blending, you'll create stunning sweeping skies while keeping the land beautifully simple with dark silhouettes. Perfect for your first landscape adventure!

🎨 What You'll Need

Essential Materials:

  • Watercolor paints: Warm colors (yellows, oranges, pinks) + cool colors (blues, purples)
  • Dark color for silhouettes: Payne's Gray, Burnt Umber, or mix your own dark
  • Watercolor paper: 140lb minimum, cold-pressed recommended

Brushes You'll Need:

  • Large wash brush (size 12-16) for sweeping skies
  • Medium round brush (size 6-8) for land details
  • Small detail brush (size 2-4) for trees and plants

Learn more about choosing the right brushes in my watercolor brushes guide.

🌈 Key Techniques

1. Sweeping Sky Blending

Work on wet paper with horizontal brush strokes, blending warm and cool colors for dramatic sky effects. The key is working quickly while the paper stays wet!

2. Simple Silhouette Technique

Once your sky is completely dry, paint simple dark shapes for land, trees, and plants. No details needed - just bold, confident silhouettes! Master these blending techniques for seamless color transitions.

Step-by-Step Landscape Painting

1.

Wet your paper -partially or completely.

2.

Start with warm colors near the horizon line - yellows and oranges. Work with horizontal sweeping motions.

3.

Blend upward with cool/blue colors - add pinks, then blues as you move toward the top of your sky.

4.

Let everything dry completely - this is crucial! Any dampness will cause your silhouettes to bleed.

5.

Paint your silhouettes with confident, simple shapes. Think rolling hills, tree clusters, and plant forms - no details needed!

💡 Pro Tips for Stunning Skies

  • Work fast on wet paper - you have about 5-10 minutes before it starts to dry
  • Use horizontal brush strokes - they mimic natural cloud formations
  • Don't overthink the silhouettes - simple shapes are more powerful than detailed ones
  • Leave some white paper in your sky for natural highlights and clouds
  • Tilt your paper slightly to help colors flow and blend naturally

🎯 Color Combinations That Work

Sunset vibes: Yellow → Orange → Pink → Purple → Deep Blue

Sunrise vibes: Pale Yellow → Peach → Rose → Soft Blue

Storm approaching: Gray-Blue → Purple → Warm Gray → Yellow highlight

Master these color blending techniques for even smoother transitions!

🌿 Simple Silhouette Ideas

  • Rolling hills - just gentle curved lines
  • Tree clusters - think cotton ball shapes on sticks
  • Tall grasses - quick vertical brush strokes
  • Distant mountains - simple triangular shapes
  • Fence posts - thin vertical lines for interest

Followed live Kolbie Blume’s demonstration/tutorial from The Pigeon Letters' free Summer Creative Retreat—such an inspiring technique to learn!

Question: What's your favorite time of day to paint in watercolor skies?

🎨 #BeginnerLandscape #WatercolorSkies #SkyBlending #LandscapePainting #BeginnerWatercolor #WatercolorTutorial #SimpleLandscape

Wednesday, August 13, 2025

Easy Neon Cat Sign in Watercolor

August 13, 2025 0 Comments
neon cat watercolor painting tutorial masking fluid gradient blending beginner guide glowing effects

Easy Neon Cat Sign in Watercolor- Step by Step
Masking Fluid & Gradient Blending Magic ✨

This playful neon cat painting is simpler than it looks! With just masking fluid, two-three brushes, and controlled wet-on-wet blending, you can create glowing effects. Perfect for beginners craving bold results.

🎨 What You'll Need

Essential Materials:

  • Masking fluid for crisp neon outlines - check my recommended supplies. Posca pen can also be used!
  • High-pigment colors (e.g., Phthalo Blue, Opera Pink for neon vibes)

Brushes You'll Need:

  • Liner brush for fine details like whiskers
  • Large wash brush (mop or alternative) for backgrounds
  • Size 4-6 brush for lifting techniques

⚡ Key Techniques

1. Lifting Paint for Glow Effects

Dab wet areas with a dry brush or paper towel to create "glow" halos around your neon signs. This lifting technique is what makes the neon effect pop!

2. Gradient Blending

Work fast! Load your brush and blend for neon fade effects - darker on the outside. Master these blending and lifting techniques for professional results.

Step-by-Step Neon Sign Painting

1.

Sketch your cat silhouette and apply masking fluid to the neon tubes. Let it dry completely before moving on.

2.

Wet the entire background and drop in darker color on the outside using wet-on-wet technique.

3.

Lift paint right on the outline using your size 4-6 brush or paper towel while the paint is still wet.

4.

Use your liner brush to create lines with a darker color parallel to the masking fluid line for added definition.

5.

Let dry completely, then carefully remove the masking fluid to reveal your crisp neon lines.

💡 Pro Tips for Neon Effects

  • High-contrast is key - Use your darkest darks against bright neon colors
  • Work in sections - Complete one neon sign at a time while paint is manageable if it is a large sign
  • Less is more with masking fluid - thin, clean lines work best
  • Practice lifting on scrap paper first to get the glow effect right

Learn more about choosing the right brushes in my watercolor brushes guide.

Followed Mako (Makoccino)'s lovely tutorial from The Pigeon Letters' free Summer Creative Retreat—such an inspiring technique to learn!

Question: What's your favorite subject for neon-style watercolor paintings?

🎨 #NeonWatercolor #MaskingFluid #GradientBlending #WatercolorCat #BeginnerWatercolor #WatercolorTutorial #NeonArt

Friday, August 8, 2025

Loose Watercolor Flower Heart (No Sketching, Just Wet-on-Wet Magic!) 🌸💖

August 08, 2025 0 Comments
wet on wet watercolor flower heart sketch free painting tutorial beginner friendly loose style

Painted this soft, flowing flower heart with no sketching—just pure play! Loved how the bright blooms faded into dreamy edges. A perfect beginner-friendly piece for anyone scared of 'perfect' lines.

The heart is painted using wet-on-wet technique, while the flowers combine both wet-on-wet and wet-on-dry techniques for beautiful texture variety.

Followed Clarice Gomes's lovely tutorial from The Pigeon Letters' free Summer Creative Retreat—such a liberating way to paint!

🎨 What You'll Need

Any colors you love will work beautifully for this piece! Depending on the size of your heart, you might need:

  • Brushes: Size 8-10 for the heart, plus size 2-4 for flower details
  • Paper: 100% cotton watercolor paper (140lb recommended)
  • Colors: Whatever makes your heart sing!

You can look through my recommended supplies to see what I use and love.

Question: Do you prefer sketch-free watercolor or guided outlines?

🎨 #LooseWatercolor #WetOnWet #NoSketchArt #BeginnerWatercolor #FlowerHeart #FreeArtTutorial