Limited Palette Guide 2025: Paint Better Art With Just 3 Colors (Proven Method)
📋 Quick Navigation: Limited Palette Painting Guide
The Limited Palette Guide: Why Fewer Colors Create Better Art (2025 Complete Tutorial)
Are you struggling with muddy watercolors? If you've ever stood before a wall of 100 paint tubes feeling completely overwhelmed, you're not alone. Most beginner and intermediate artists believe more colors mean more creative possibilities. However, professional artists know the secret: vibrant, harmonious, and museum-quality art comes from using fewer colors, not more. This is the transformative power of the limited palette painting technique.
This comprehensive limited palette guide will walk you through exactly what a limited color palette is, its scientifically-proven benefits for color harmony, and how you can start using this professional technique today to completely transform your watercolor paintings.
⏱️ Quick Summary: A limited palette uses only 3-5 carefully selected colors to create entire paintings, guaranteeing color harmony, eliminating muddy colors, and dramatically improving your color mixing skills.
What is a Limited Palette? (And Why Top Artists Swear By It)
A limited palette is a deliberate artistic choice to use a small selection of colors—typically between 2 and 5 pigments—for an entire painting. Far from being restrictive or "beginner-level," this is a powerful professional strategy used by master artists throughout history to achieve perfect color harmony and elevate their work to gallery quality.
Common Limited Palette Misconceptions:
❌ Myth: "Limited palettes are only for beginners learning basics"
✅ Truth: Professional artists are using limited palettes for their masterpieces
❌ Myth: "You can't paint realistic subjects with only 3 colors"
✅ Truth: A well-chosen triad can mix hundreds of nuanced, realistic hues
❌ Myth: "Limited palettes make boring, dull paintings"
✅ Truth: Limited palettes create more vibrant, harmonious results than random color choices

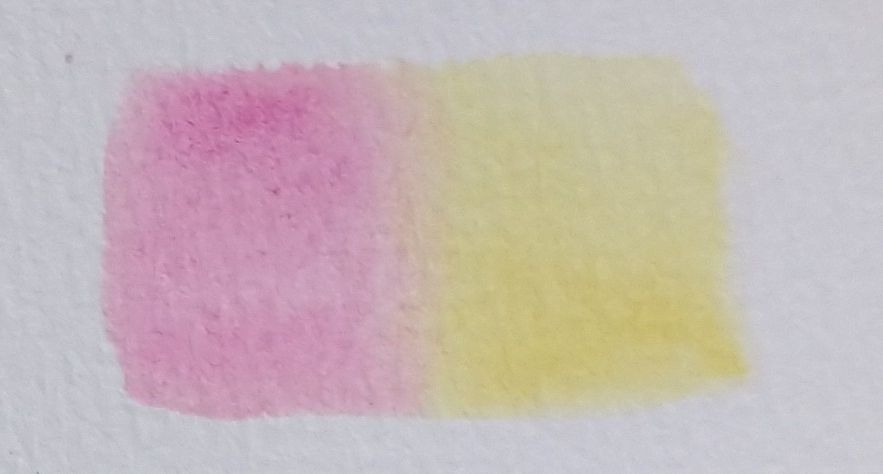
Primary color triad for limited palette watercolor painting - learn how three colors create perfect color harmony
5 Scientifically-Proven Benefits of Using a Limited Color Palette
1. Guaranteed Color Harmony Every Time
The Science: When every color in your painting descends from the same 3-5 "parent" pigments, they naturally belong together on a molecular level. This creates automatic color harmony that's nearly impossible to achieve when randomly selecting from 50+ tube colors.
Real Result: Your paintings will look professional and cohesive, even if you're a complete beginner. No more colors that "just don't look right together."
2. Eliminate Muddy Watercolors Forever
The Problem: Muddy, gray, lifeless colors are the #1 complaint from watercolor artists. This happens when you mix pigments with too many different chemical bases—they literally cancel each other out optically.
The Solution: A limited palette simplifies the pigment chemistry. With fewer base pigments in play, your color mixtures stay clean, vibrant, and predictable every single time.
Real Result: Say goodbye to muddy browns when you wanted purple. Your mixed greens will actually look like grass, not dishwater.
3. Master Color Mixing 10X Faster
There is no better color mixing education than a limited palette. When you only have 3 colors to work with, you're forced to understand how they interact. You'll discover:
- How to push primary colors to create dozens of secondary hues
- The secret to mixing realistic, neutral browns and grays
- How to create rich, luminous darks without using black
- Which color combinations create the most vibrant results
Real Result: After just 3-5 paintings, you'll intuitively know how to mix any color you can imagine.
4. Speed Up Your Painting Process & Reduce Artist Anxiety
Decision Fatigue is Real: Psychology research shows that every decision we make depletes our mental energy. When you're choosing from 100 paint colors, you're exhausting your creative brain before you even start painting.
The Limited Palette Solution: With only 3-5 colors to choose from, decision-making becomes effortless. You spend less time staring at your palette in paralysis and more time in creative flow.
Real Result: Painting becomes meditative and enjoyable instead of stressful. You'll finish more paintings and actually enjoy the process.
5. Develop Your Signature Artistic Style
Many recognizable artists are known for their distinctive color schemes. Think of the warm, glowing tones in Johannes Vermeer's work, or the limited earth-tone palette of Andrew Wyeth. These signature styles often emerge from consistently using specific limited palettes.
Real Result: Your artwork becomes instantly recognizable as "yours." You develop a consistent artistic voice that collectors and followers will remember.
How to Start: Choosing Your First Limited Palette (Step-by-Step)
You don't need special paints or expensive supplies to start with a limited palette—you just need a smart plan. Here are the most effective limited palette combinations, from beginner to advanced:
Option 1: The Three-Color Primary Palette (Best for Beginners)
Perfect for: Complete beginners, watercolor artists, anyone who gets muddy colors
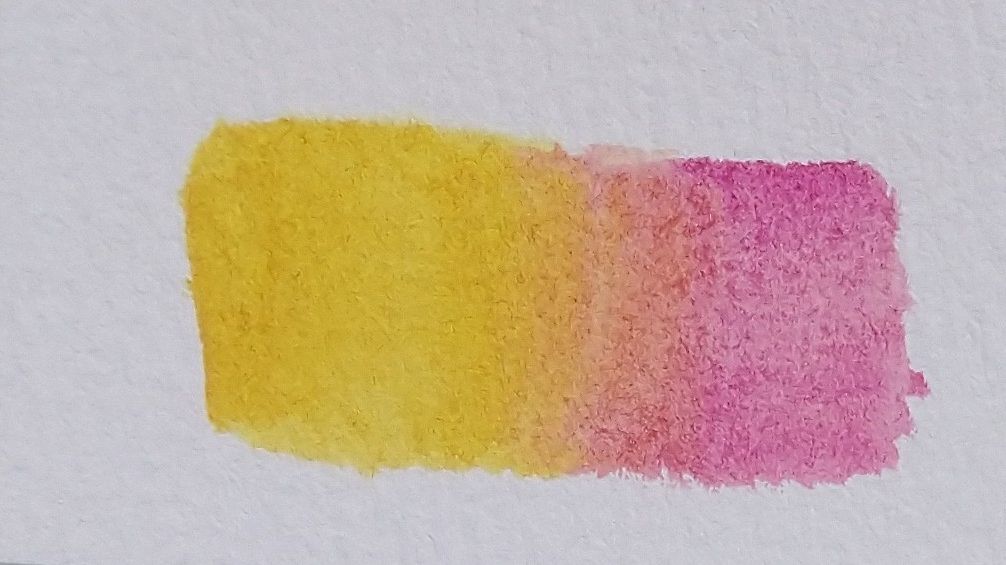
The Colors:
- One Yellow: Cadmium Yellow Light, Hansa Yellow, or Nickel Azo Yellow
- One Red/Magenta: Quinacridone Magenta, Permanent Rose, or Cadmium Red
- One Blue: Ultramarine Blue, Phthalo Blue, or Cobalt Blue
💡 Pro Tip: This is the ultimate learning palette. It forces you to understand color mixing fundamentals that will transform every painting you create for the rest of your life.
Option 2: The Split-Primary Palette (Intermediate)
Perfect for: Artists ready to expand their range while maintaining harmony
The Colors (6 total):
- Warm Yellow: Cadmium Yellow Light or New Gamboge
- Cool Yellow: Lemon Yellow or Hansa Yellow Light
- Warm Red: Cadmium Red or Scarlet
- Cool Red: Alizarin Crimson or Quinacridone Magenta
- Warm Blue: Ultramarine Blue or Cobalt Blue
- Cool Blue: Phthalo Blue or Cerulean Blue
💡 Why This Works: The split-primary system gives you access to the most vibrant possible color mixtures while still maintaining perfect harmony.
Option 3: The Earth Tone Palette (Advanced/Landscape Artists)
Perfect for: Landscape painters, atmospheric scenes, natural subjects
The Colors:
- Burnt Sienna or Raw Sienna
- Yellow Ochre
- Ultramarine Blue
- Optional: add Burnt Umber or Raw Umber for rich darks

Recommended limited palette setup for watercolor beginners - three primary colors for vibrant, mud-free painting
How to Avoid Muddy Colors: The Complete Solution
Problem: Why Do My Watercolors Turn Muddy and Gray?
Muddy colors happen when you mix pigments with conflicting chemical bases. For example, if you mix a yellow with iron oxide, a red with cadmium, and a blue with phthalocyanine, these three different chemical families fight each other optically, resulting in dull, lifeless mud.
Solution: The Limited Palette Eliminates Mud Scientifically
When you use a limited palette, every mixed color shares common "parent" pigments. This creates:
- Chemical compatibility: Pigments that naturally work together
- Optical clarity: Mixed colors stay vibrant because they share DNA
- Predictable results: You learn exactly what happens when you mix specific colors
Additional Tips to Prevent Muddy Watercolors:
✓ Don't mix more than 3 colors together at once
✓ Use less water when mixing to maintain color intensity
✓ Clean your brush between colors to avoid contamination
✓ Test your mixes on scrap paper before applying to your painting
✓ Use transparent pigments rather than opaque ones for cleaner mixes
Real-World Results: Limited Palette Paintings That Prove It Works
See the Limited Palette Technique in Action
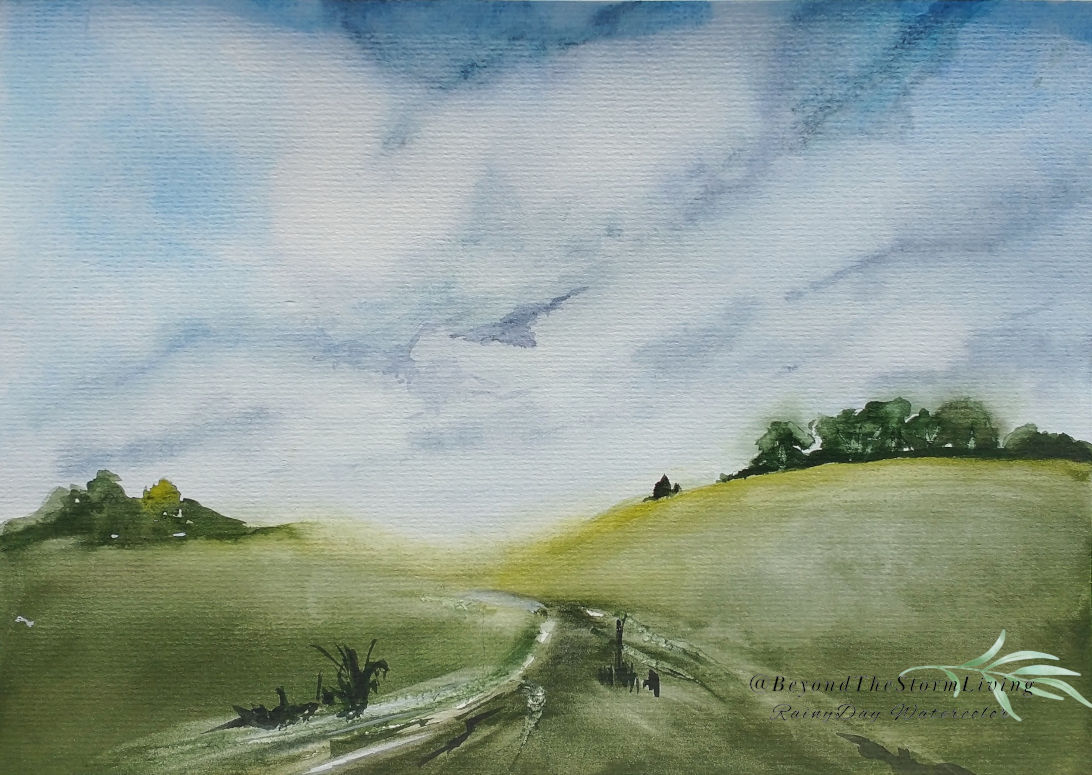
Look at the vibrant color harmony in this stunning lily painting below—created with just three watercolor pigments. Every single hue you see, from the deep purples to the soft greens to the rich shadows, was mixed from a simple primary triad.

Click to see the full painting →
Vibrant lily painted with limited palette - three primary colors create perfect harmony and mud-free watercolor results
Notice: The colors are vibrant, clean, and harmonious. No muddy mixtures. No clashing hues. This is the power of a limited palette.
The 3 Colors Used:
• Nickel Azo Yellow
• Quinacridone Magenta
• Phthalo Blue
From just these three pigments, this painting contains: Purple/magenta petals, yellow-green leaves, warm shadows, cool highlights, neutral stems, and rich darks—all perfectly harmonized.
📚 Want More Limited Palette Examples?
See My Chinese Brush Painting Gallery →
Discover how traditional Chinese artists use limited palettes for stunning results
Your Action Plan: Start Your First Limited Palette Painting Today
Step-by-Step Challenge:
Week 1: Choose your 3-color primary palette (yellow, red, blue)
Week 2: Create a color mixing chart - mix every possible combination
Week 3: Paint a simple subject (fruit, flower, or simple landscape)
Week 4: Paint a more complex subject using only your limited palette
🎨 I guarantee: By week 4, you'll be amazed at the vibrant, harmonious results you can achieve with just 3 colors!
Frequently Asked Questions About Limited Palette Painting
What is the best limited palette for watercolor beginners?
The best limited palette for watercolor beginners is a three-color primary palette using single-pigment yellow (like Hansa Yellow), red (like Quinacridone Magenta), and blue (like Ultramarine or Phthalo Blue). This teaches fundamental color mixing skills while guaranteeing harmonious results and eliminating muddy watercolors.
Can you really mix any color with just 3 paints?
While you cannot mix every single manufactured hue (like certain intense fluorescent or neon colors), a well-chosen limited palette of 3 primary colors can mix a vast and harmonious range of colors suitable for 95% of realistic subjects. You can create hundreds of unique hues, including vibrant secondaries, subtle neutrals, and rich darks.
Why do my watercolors always look muddy and how can I fix it?
Muddy watercolors are caused by mixing too many incompatible pigments together, overmixing on your palette, or using low-quality paints with fillers. The solution: use a limited palette (3-5 colors maximum) so all your mixed colors share common pigments, mix colors gently without overworking, use professional-grade transparent pigments, and clean your brush between colors to prevent contamination.
What is the difference between a limited palette and a full palette?
A limited palette uses only 2-5 carefully selected colors for an entire painting, forcing you to mix all other hues from these base colors. A full palette includes 12-50+ pre-mixed tube colors. Limited palettes guarantee color harmony, teach superior mixing skills, and eliminate muddy colors, while full palettes offer convenience but often result in chaotic, unharmonious color schemes.
Which famous artists used limited palettes?
Many master artists used limited palettes: Anders Zorn famously used only 4 colors (yellow ochre, vermillion, ivory black, and white), John Singer Sargent often worked with limited earth tones, Diego Velázquez used restrained palettes for his portraits, and many contemporary watercolor masters like Joseph Zbukvic advocate for limited color choices to achieve professional harmony.
How long does it take to master color mixing with a limited palette?
Most artists see dramatic improvement in color mixing skills within 3-5 paintings using a consistent limited palette. Complete mastery typically develops over 20-30 paintings or 2-3 months of regular practice. The learning curve is much faster than working with a full palette because you're working with fewer variables and can truly understand how each color behaves.
Should I use warm or cool primary colors for my limited palette?
For beginners, start with one version of each primary (one yellow, one red, one blue) chosen based on your subject matter. For landscapes, use cool